When you first receive BizTrack your system will be setup by a BizTrack associate, including your Company information and your Pay Structure.
Below is a brief overview of the tasks that will need to be completed so your company can start using BizTrack.
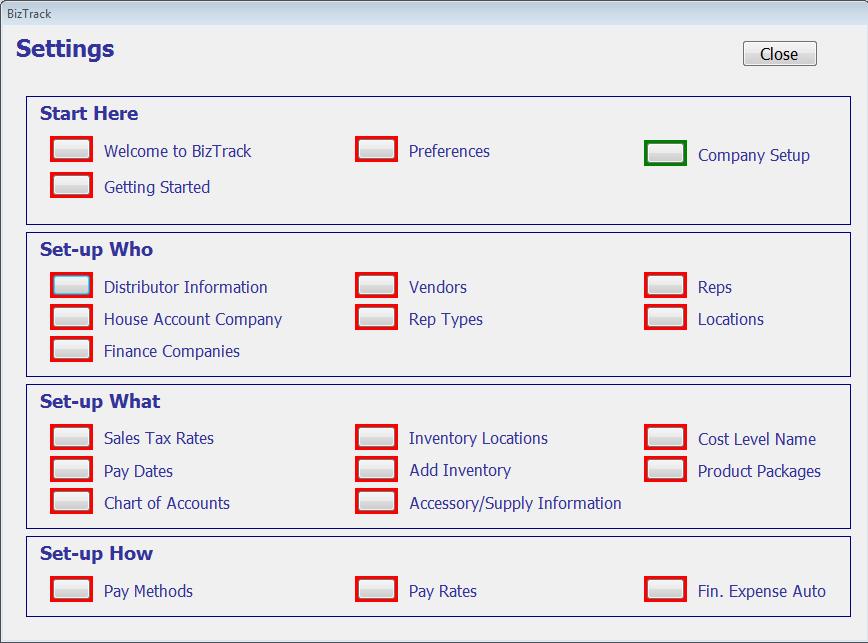
There are 14 easy steps needed to get BizTrack up and running, all of these will be setup initially with a BizTrack associate, any of these settings can be changed at any time.
Hint: You can click on any of the Blue links below to take you directly to that setting.
|
Setup your Distributor Information. Phone Numbers, addresses, etc. |
|
|
2.) Vendors |
Setup your Vendors List. Gas stations, office supply Vendors, etc. |
|
Setup your Finance Companies. |
|
|
4.) Rep Types |
Define your Rep Types (Senior Dealer, Junior Dealer, etc.) |
|
5.) Reps |
Setup your Reps Files. Rep info, pictures, Pay Rates, etc. |
|
6.) Sales Tax Rate |
Define your Sales Tax Rates. You can define by city, county, state. |
|
7.) Pay Dates |
Setup your Pay Dates, whether you pay weekly, bi-weekly, etc. |
|
Assign Pre-Determined Bonuses, Advances, Over-Rides, etc. |
|
|
Define your storage locations. |
|
|
10.) Add Inventory |
Add Inventory to your stock. |
|
Setup your Accessory/Supply information. Prices, cost levels for Reps, etc. |
|
|
12.) Pay Methods |
Add your Pay Methods, anyway you get paid. |
|
13.) Pay Rates |
Setup your Pay Rates for your Reps, this will be done initially by BizTrack. |
|
Assign Pay Rates to your Reps. |
Distributor Information Top of Page
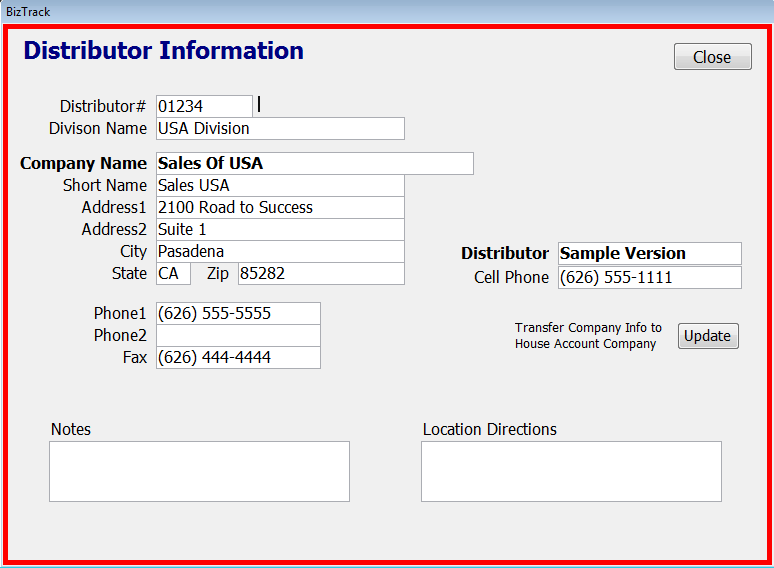
o Enter all Distributor Information in this form.
Hint: You can use the "Enter" or "Tab" keys to go between different fields instead of having to use your mouse.
Vendors Top of Page
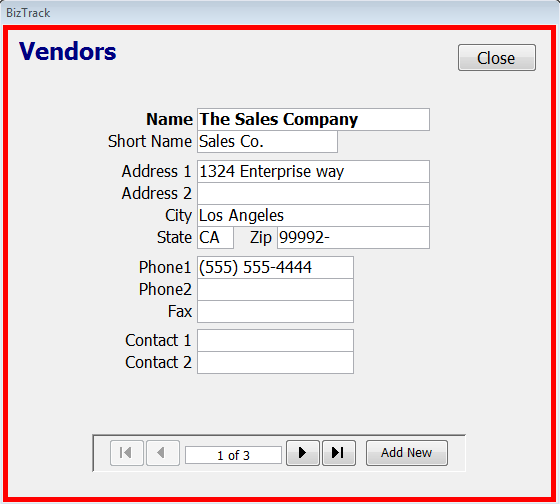
The Sales Company is already entered as the first. To add new Vendors, click on the "Add New" button and enter the information. When you are finished adding your Vendors close the form.
o Some Vendors might be the Gas Station where you have a gas account you use for your Teams/Crews, the Premiums vendor where you buy supplies, etc.
Finance Companies Top of Page
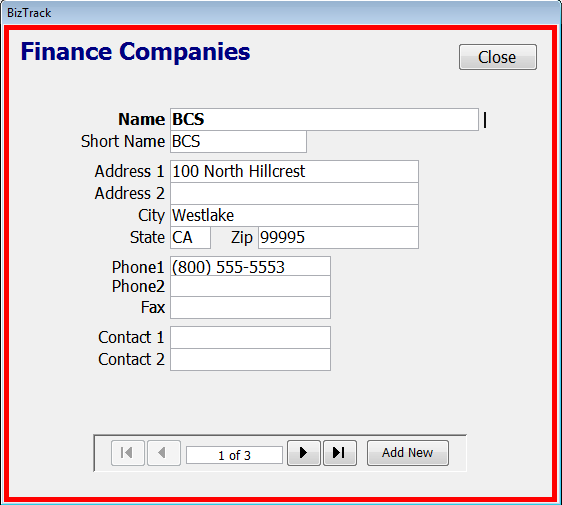
This form is for you to define what Finance Companies you use, simply press "Add New" to add another Finance Company and fill in the information.
o After you define your Finance Companies here you will need to finish setting them up by going to "Pay Methods"
Rep Types Top of Page
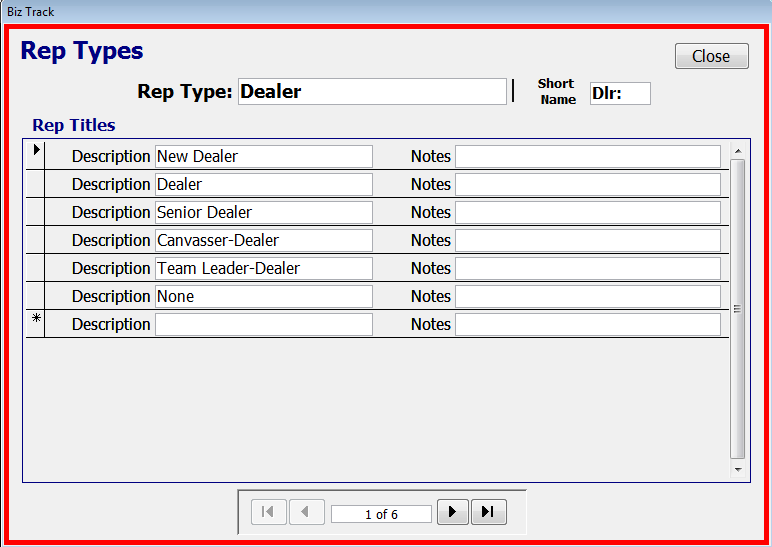
BizTrack considers anyone who receives a commission that is tied to the sales process to be a Rep.
There are 6 different Rep Types:
Dealer: Representative who did the Demo and sold the Product.
Canvasser-Telemarketer: Representative responsible for the appointment.
Team Leader: Representative who leads a team/crew.
DPS: Representative who recruits
Management: Sales Manager, Telemarketer Supervisor, General Manager.
Distributor: FD-DT-AD, Inside AD, etc
o You can define the names of the Rep Types any way you choose as long as they fall into the appropriate category. For example, in your Office you may call a Team Leader a Field Counselor, Crew Leader, Supervisor, etc.
Step 1: Use the navigation arrows at the bottom to click through the 6 Rep Types. Type in the Rep Type box the name of the Rep Type you want to see on some of your reports. Be careful that the name you change to falls in the same primary category showing. For example, Dealer = Dealer type name, Canvasser = Canvasser type name, etc.
Step 2: Set up different "Rep Titles" for any Rep Type position that will receive a different commission. For example, under the Rep Type Dealer, you may set-up New Dealer, Dealer, Senior Dealer, etc.
Reps Top of Page
.png)
All Reps must be added here before they can be assigned to a Sale.
To enter a new Rep:
o Click on "Add New" at the top to go to a blank form.
o Next, fill in the "Contact Info" in the "General" tab.
o Enter a "Start Date" and select the "Active" check-box in the Status Section.
o Next, select a DPS if appropriate.
o Next, select "Recruited By" Rep name if the Dealer was recruited by a current Rep who is participating in the Buddy Program or Club 11 program.
o If this is your initial set-up of the program, enter all your Reps information on the General Tab only and close the form and continue with Step 6 of "Setting up BizTrack"
o If this is not your initial set-up, go to the "Pay Rate" tab and Click Here for instructions.
Sales Tax Rates Top of Page
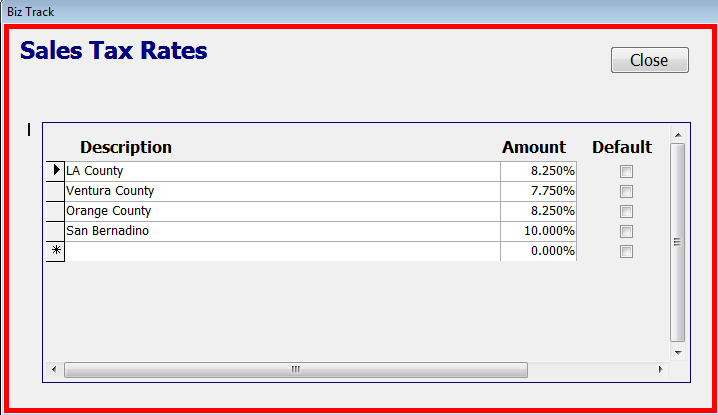
Step 1: Type in a description of the County or area and its appropriate tax rate. You can enter as many Tax Rates as you choose. Enter the rate as a decimal. For example 10% would be entered as ".10"
o IMPORTANT - If your Sales Tax Rate changes, do not change the rates being used. Create a new record at the bottom with the same Location Name in the Description column and the different Tax Rate. This way all your old tax rates that were assigned to sales remain unchanged.
o If you have a complicated Sales Tax system in your State that does not conform to this set-up, please contact us.
Step 2: Set any other options you may have as described below.
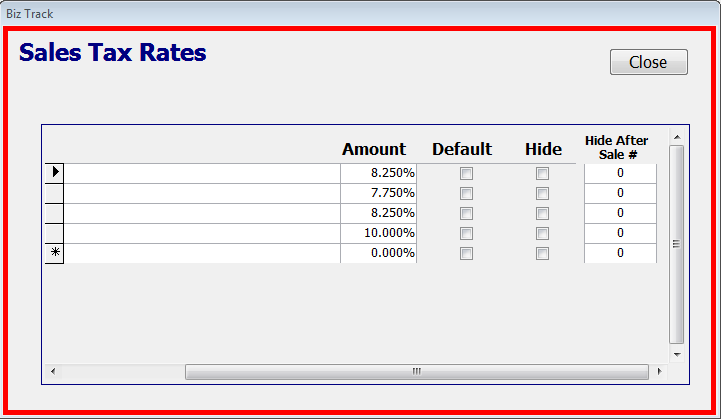
o You can change other options for your Sales Tax Rates by using the scrollbar at the bottom and moving it right:
Default: The default column lets you choose one of the tax rates to be the default tax rate when a new sale is created.
o Hide: The hide column lets you hide an old tax rate that is not currently being used. Make sure you enter a Sales number that you would like to start hiding the tax rate so that all sales before this Sales number will still display the old tax rates being used.
o Hide After Sale#: Use this space to enter the Sales number that you would like to start hiding the tax rate so that all sales before this Sales number will still display the old tax rates being used.
Pay Dates Top of Page
Pay Dates are Pre-Assigned dates that you pay your Representatives, whether you pay them weekly, or any other way, BizTrack gives you the flexibility to Pay your sales by selecting a Pay Date of your choice in the Sales Order form.
o Fill in your first Pay Period on the top line, then simply click "Add 7 Days" and BizTrack will add the next Pay Periods for you.
.png)
Pay Date:
The actual day you Pay your Reps
Start Date:
The day your pay period starts.
End Date:
The day your pay period ends. BizTrack will bring all Sales marked "OK to Pay" that were sold on or before this End Date for the Pay Date assigned in the Sales Order form.
Chart of Accounts Top of Page
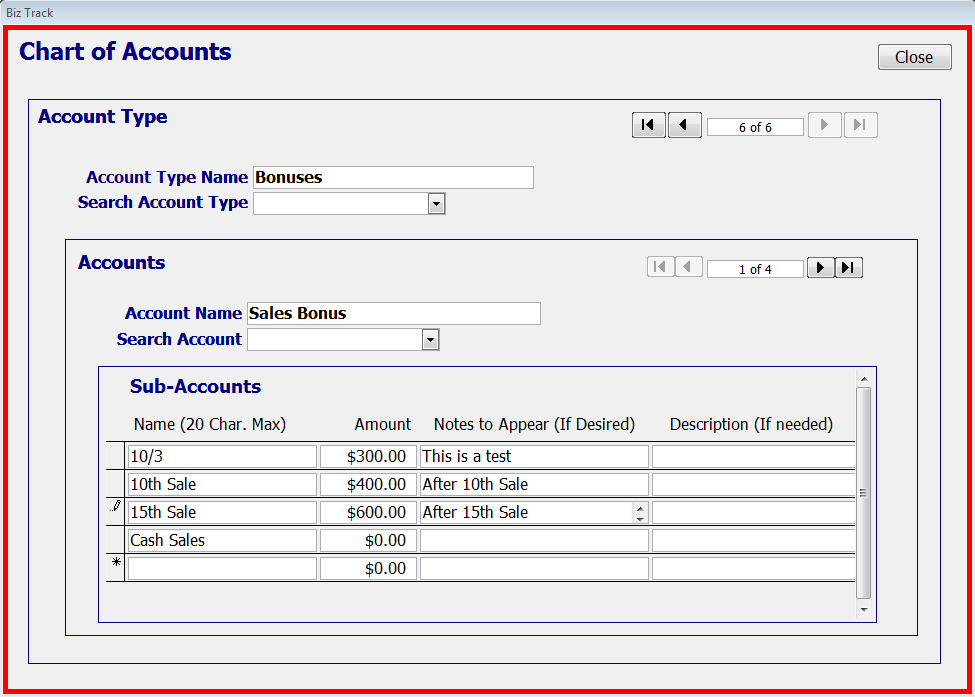
This form displays the Account Types and their Sub Accounts. These are used for grouping accounting categories.
There are three levels of Accounts.
Account Types:
The accounting for reports are divided into 6 Account Type categories:
1.) Commissions: which include sales commissions and over-rides.
2.) Bonuses: which include sales, performance, contests, etc.
3.) Advances: which include money given to be deducted from earnings.
4.) Deductions: which include fuel, supplies, vehicle maintenance, etc.
5.) Savings: which include contributions and withdrawals.
6.) Other: which includes payment to ledger balance and misc.
Accounts:
Each Account Type may be divided into Accounts that fall under the Acct Type category. You can display the Accounts by Searching the Account Type and selecting from the list. This will display the Account below.
Sub Accounts:
Each Account can be broken down into Sub-Accounts that fall under the Account category. These Sub-Accounts appear on certain reports.
Account Types and Accounts cannot be changed, but you may add your own Sub-Accounts. To add Sub-Accounts, select the empty box under "Name" in "Sub-Accounts" and enter a name maximum 20 characters long. You can then type a description if you like.
Inventory Locations Top of Page
This form displays 11 permanent Inventory Locations.
o You can add others but the 11 must remain because many reports and advanced Inventory tracking depend on these locations. However, you can change the name of Storage Facilities.
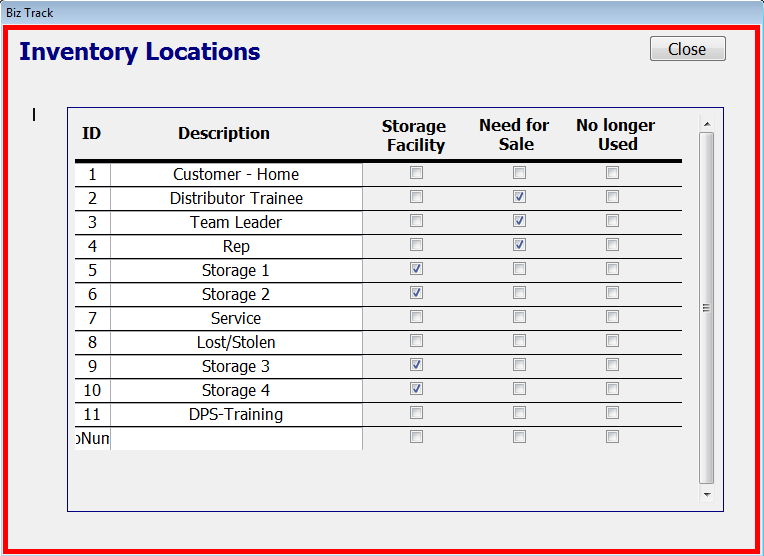
The "Storage Facility" column allows you to check off the Inventory Locations you want to have special Storage rules.
For example, all new Units must first be assigned to a Storage Facility when you first enter new inventory into BizTrack.
From there you can assign the Units to other locations such as a Team Leader or DT via the Inventory: Consign Products form.
Additionally, inventory serial numbers can only be changed or deleted when they are in a Storage Facility. If you add new Inventory "Storage" Locations make sure you check the box to the right.
The "Need for Sale" column allows you to choose which Inventory Locations will be used as a location that a serial number must be assigned to first before it can be sold. This will be the serial numbers in the Sales Form that appear when you select the "Enter Serial #" drop-down box. For example, a Unit can not go from a Storage Facility to a customer's home without someone taking it. In almost all cases this will be a Rep, Team Leader or DT, that is why their locations are checked off.
The "No Longer Used" column allows you to check of the Inventory Locations you no longer use. You can not delete an Inventory Location once it is created, but you can change its name. You can not delete locations because there may be records that include an Inventory Location.
Add Inventory Top of Page
Use this form to enter your Product stock, follow the instructions below to learn how to enter inventory.
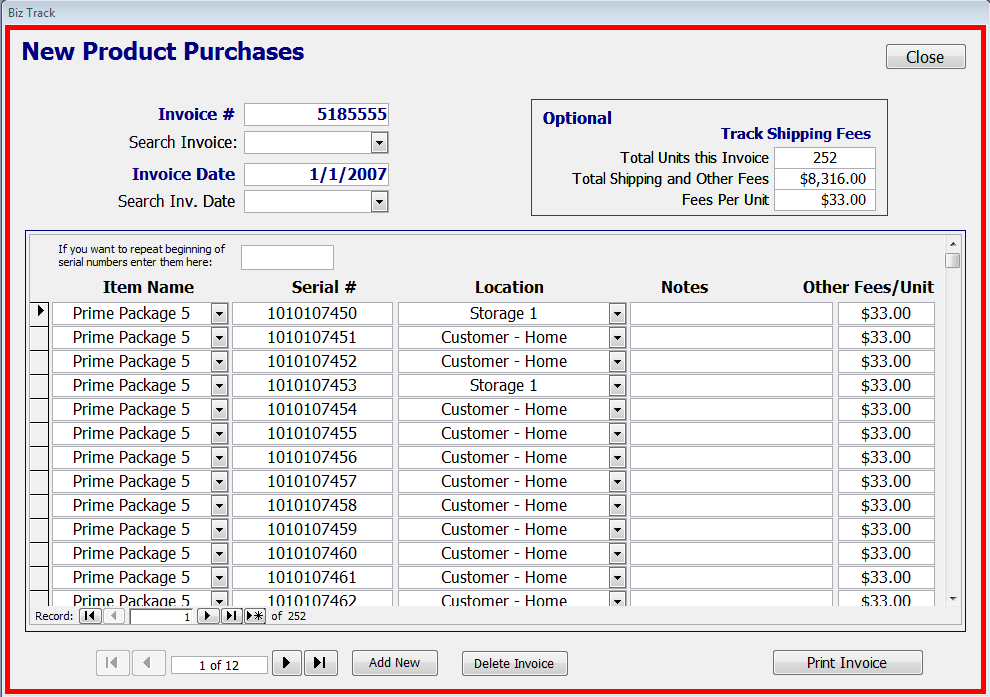
A serial number must first be entered here before it can be sold.
To enter new Product Stock:
Step 1: Click the "Add New" button at the bottom to start with a new
record.
Step 2: Enter the Invoice # from your Product Invoice.
Step 3: Enter the date on your Product Invoice.
Step 4: Use the "Optional-Tracking Shipping Fees" if you want to track accurate Product costs. (Click on the "Optional" word for more details)
Step 5: Enter the serial numbers for each Unit from the Product Invoice in the box labeled "Serial #" The Product Model will default to the newest model.
Each column is defined below:
Product Model:
Will default to the newest Model, but can be changed.
Location:
The location choices will be determined at Settings and will default to the location you choose.
Other Fees/Unit:
This is the amount of fees paid per Unit for shipping, warehouse charges, storage, if any, or other fees added to your invoice when you received your Product shipment. This amount is automatically calculated by using the "Optional-Track Shipping Fees" section above. These will be used later to calculate an accurate profit per sale in other reports.
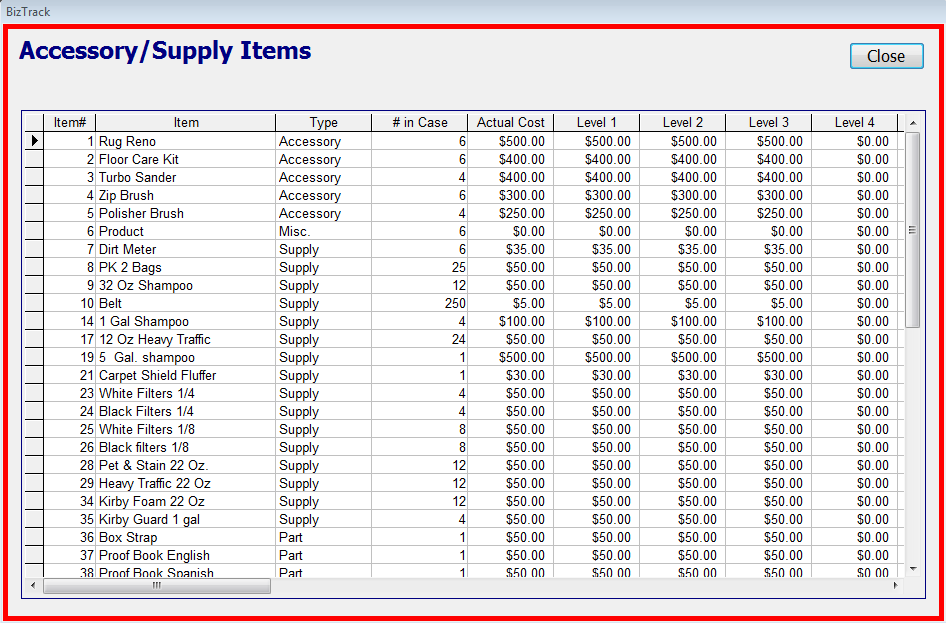
Accessory/Supply Information Top of Page
This form is used to specify prices and costs for different level Reps, when you enter in supplies on the sales form it will look here for the cost for that Rep who made the sale.
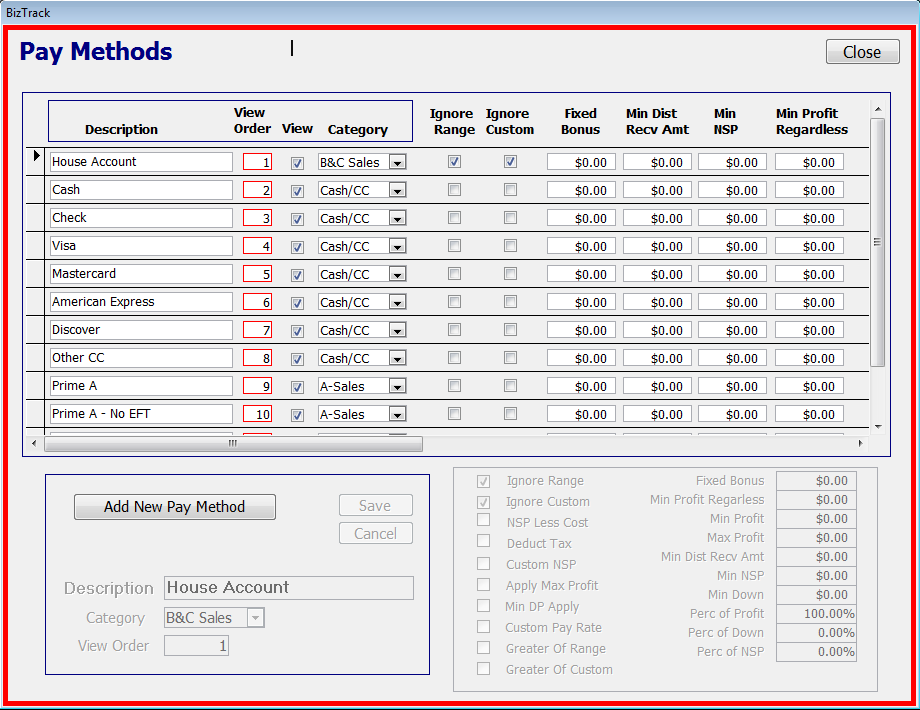
Pay Methods Top of Page
This form defines your Pay Methods. A Pay Method can be used to determine how a Rep is paid.
o This form will be set-up at your initial consultation and training. We will walk you through the set-up so that you will know how to add Pay Methods and how you use them.
Pay Rates Top of Page
The Pay Rates section of BizTrack will be setup by a BizTrack associate, and can be changed to fit your needs at anytime.
Rep's Pay Rate Selection Top of Page
This will also be setup during your initial setup, we will be glad to train you on how to use it.